So, as I’ve already mentioned, I’ve recently had a first game of Xenos Rampant, the new sci-fi skirmish rules by Dan Mersey and Richard Cowen. They follow the successful “rampant” format, which I like, so I had some hopes that they might rekindle my interest in sci-fi gaming.
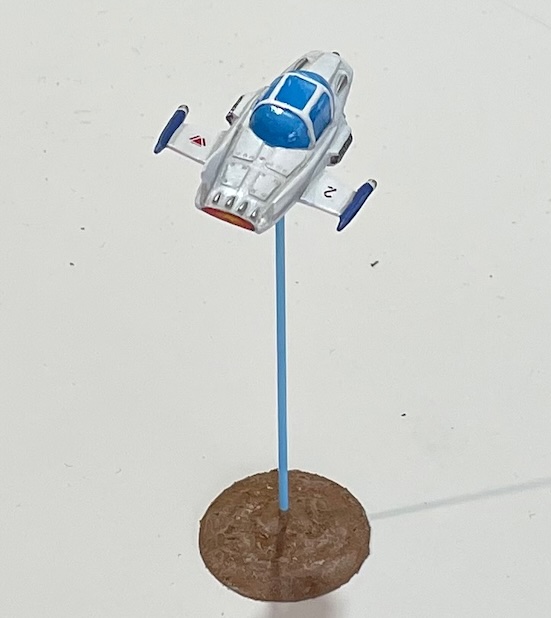
I dug out my 15mm collection, set up a small colony settlement and off we went. It really was a fun game, with the consequence that I plunged into my 15mm sci-fi lead pile and fished out some stuff I wanted to paint up for a very long time. The first was this little spacecraft:
Someone on Facebook told me it’s a craft form an old Gerry Anderson puppet show, which never made it to Austria. I like its quaint and whimsical retro-look.
The whole thing also gave me the idea for a simple campaign. I’ve been fleshing out a sci-fi background for a while now (some of it went into my Traveller RPG campaign), so I have a lot of ideas floating around. Let’s see if we actually play it. But it’s fun to paint a couple of sci-fi figures, and it’s also satisfying to finally finish things that have been lying around for a long time.
Another year ended, another end of the year report. The first thing that comes to mind is that I didn’t blog as much as I would have liked, but this is about my gaming year, not my blogging year. So what have I played? Let’s have a look at the Boardgamegeek statistic.
Top of the list is Travellerwith 21 plays. The remote RPG group has become a real mainstay of my gaming. We meet pretty regularly, which means that we could finish the sci-fi campaign this year. We did a number of one-shots with other systems and will now start a new campaign, with Martin as GM running Call of Cthulhu. I’ve already made a character – a rare books dealer – and I’m very much looking forward to it! There was also a bit of face-to-face role-playing, most memorably Cthulhu Dark and Fiasco. I definitely want to try out more story-telling games in the vein of those two in 2024.
Summer event 2023 – an outdoor game of What a Cowboy!
Miniature wargaming wise, this was definitely the year of What A Cowboy. The rules were released in April and I played my first game at the beginning of March. From then on, I played a number of single games with different people as well as two campaigns remotely with Stephan in Sweden and Martin. WaC was also the game of choice for our yearly summer event, which was one of the highlights of 2023. This time, we not only had guests from France (Manu brought this nephews), but also a spontaneous appearance by my nephew, which made me especially happy as I haven’t played with him for ages. The only downer was that Christoph was missing this year… hopefully, he will be back in 2024!
The battle at the Head of Passes.
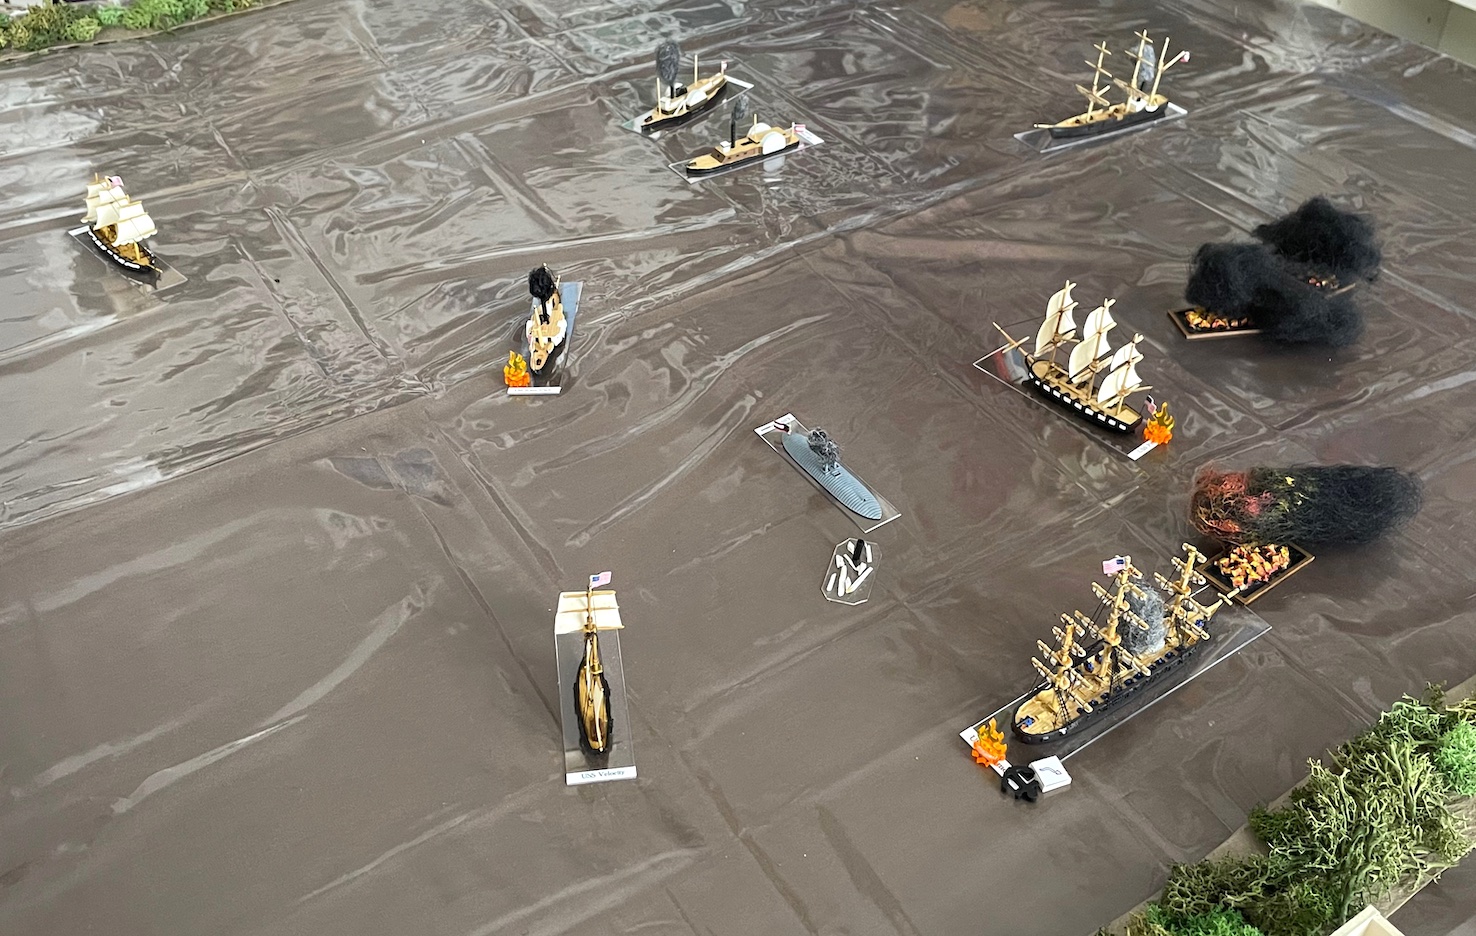
Among the top three on the BGG list, you will also spot a game with the unattractive name Unpublished Prototype. This is the BGG placeholder for games that are not yet published and therefore not in the database. In my case, it refers to my American Civil War naval rules. I’ve been thinking about those for a couple of years now and in summer, I suddenly got the urge to finally wrap them up. I did a lot of playtesting, but also printed, modeled and painted numerous ships. By October, the game felt like it was finally finished – feedback from different players was pretty good, I had most of the rules text and was playing around with the layout. Then, I was hit by a wave of self-doubt and began to dismantle everything I’ve designed and written so far, with the idea of starting anew from scratch. Fortunately, I realised what was happening and pulled the emergency brake in time. With the plan to take a step back and have a short break from the design process, I decided to occupy myself with something else for a time.
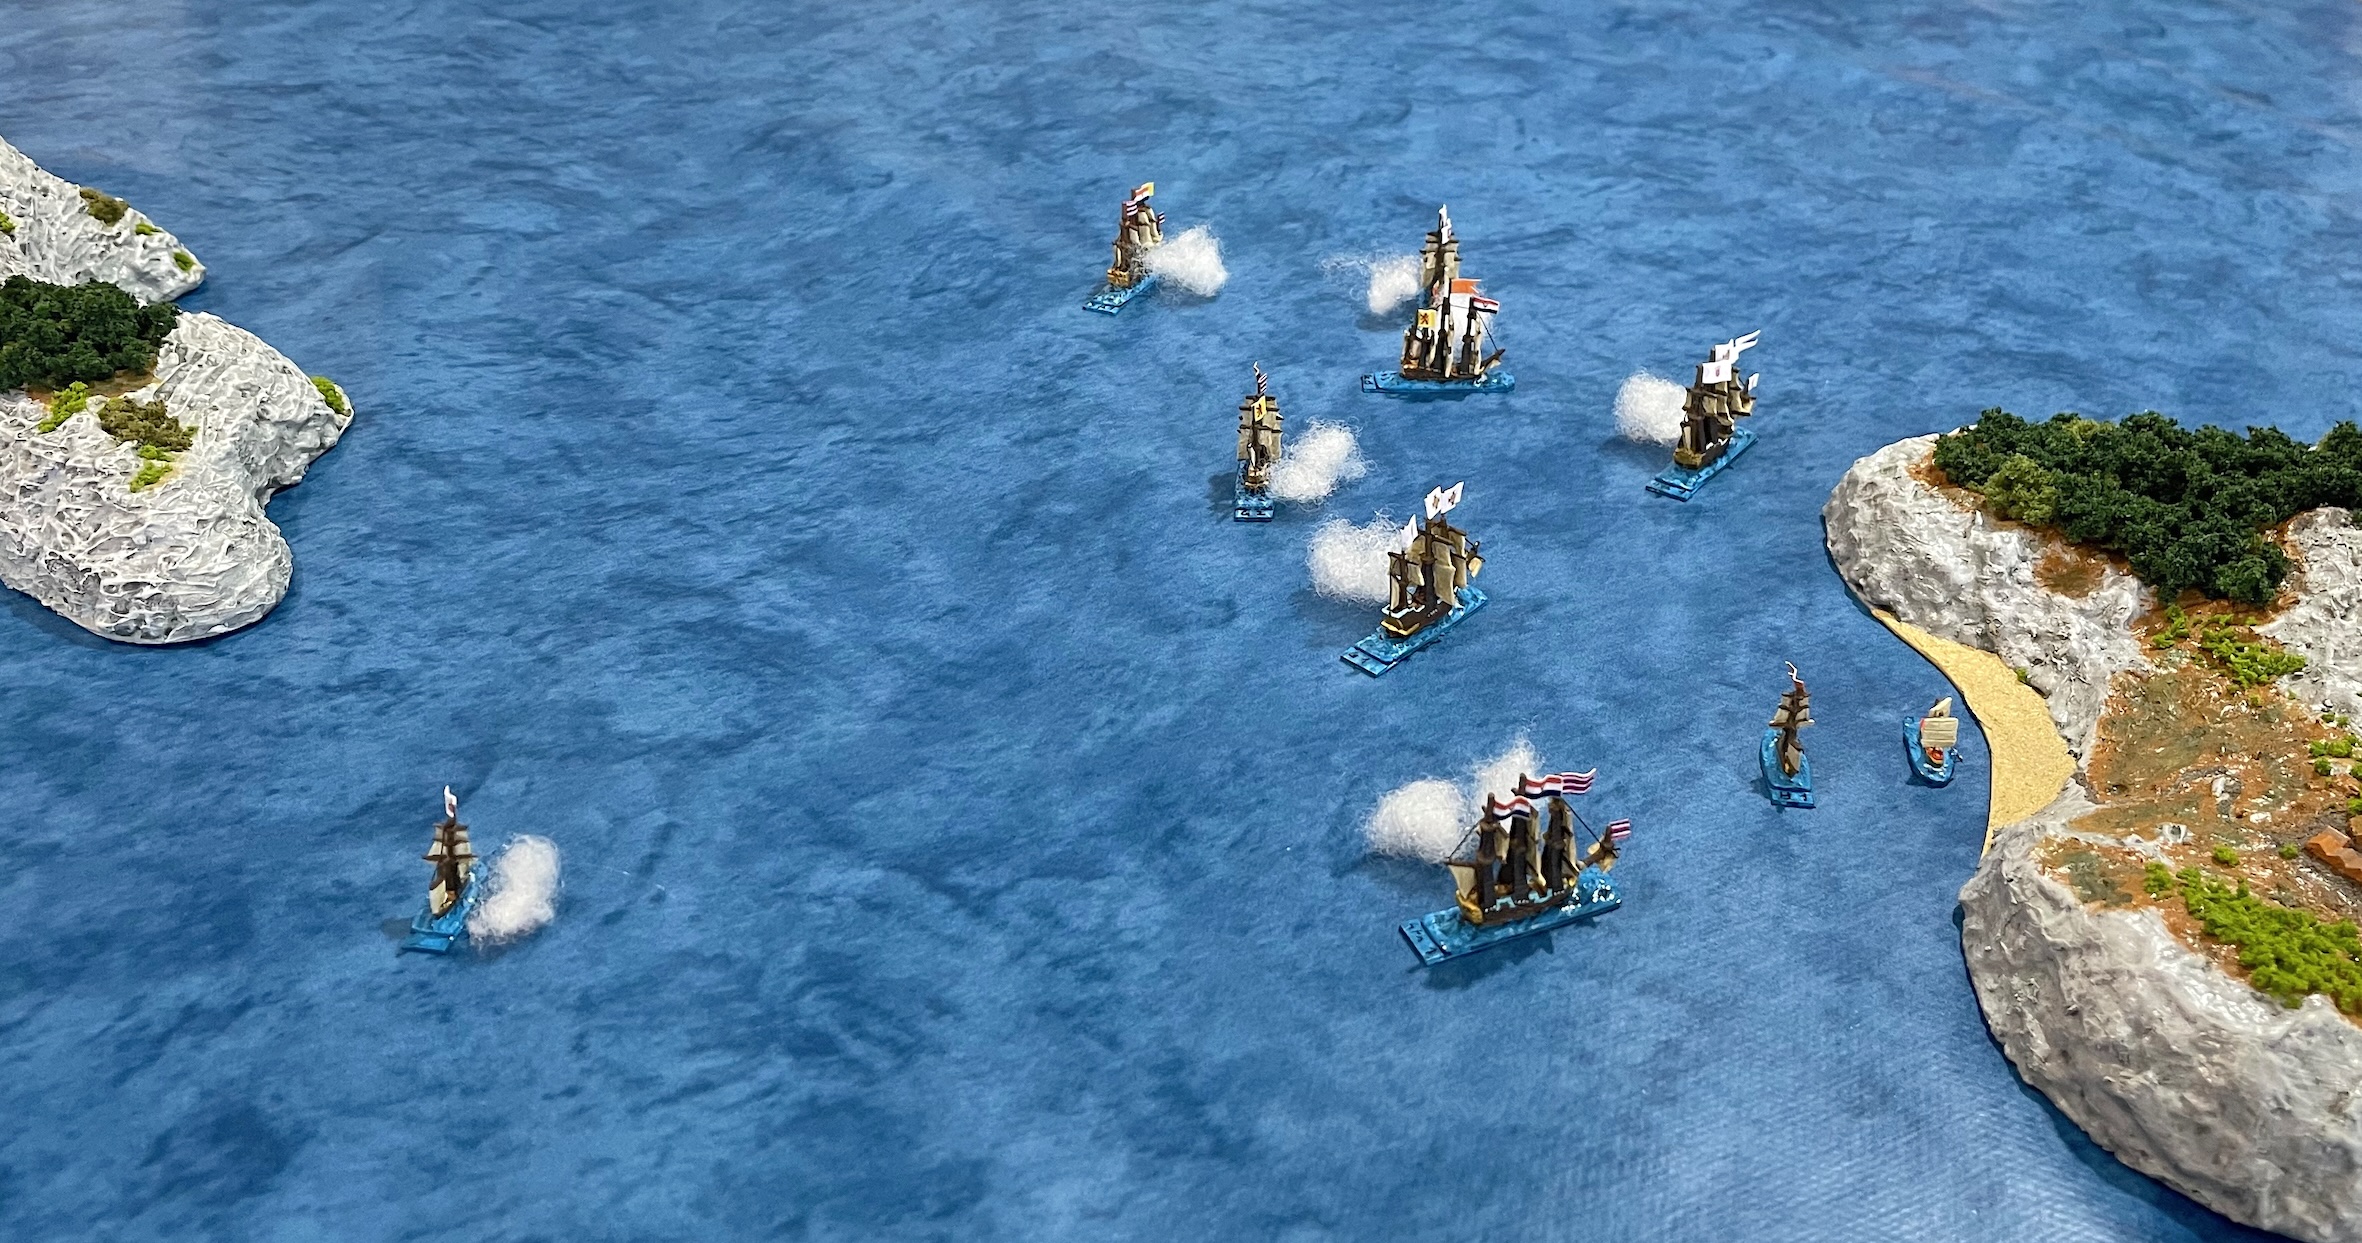
Somewhere in the East Indies…
Along came Mad for War. I’ve been following Barry Hilton’s progress via Facebook for a while and always found it very inspiring, so I decided to take the plunge. The rulebooks really is gorgeous and the rules are fun. I painted a couple of 1/2400 ships from Tumbling Dice, which are lovely, and started to read about the period. I got especially interested in the early colonial actions involving ships from the Dutch East Indies Company in the early part of the 17th century. I also tinkered with David Manley’s Far Distant Ships, a great set of rules which I have adapted to the early 17th century by completely changing the command and control mechanics. Then I had the idea that a campaign with combined land operations would be fun, as I remembered my mate Sigur’s huge collection of 10mm 30 Years War figures – couldn’t they be used for the European troops? We played a test game of Irregular Wars, a set of rules specifically designed for small colonial battles in the 16th and 17th centuries, and I liked to so much that I placed an order with Pendraken for 10mm Indians to represent the small Sultanates of the various East Indian islands.
Trying out Irregular Wars.
I also played a number of other miniatures wargames. Christoph ran 7TV Fantasy, which has some really interesting mechanics.
7TV.
I did get in a couple of games of Sharp Practice at the beginning of the year, with the large birthday game covering the skirmish at Eferding in 1809 being another highlight of 2023. I also had a fun game of Song of Drums and Shakoswith parts of Sigur’s splendid 28mm napoleonic collection (see his blog for an AAR) and also had another go at big battle napoleonics using my 6mm collection. This time, I tried Drums and Shakos Large Battle, but again it was not what I’m looking for.
Speaking of napoleonics, another of the year’s highlights was touring the battlefield of Wagram and visiting the local museum. This was not only a great day out, but also very insightful and something that I definitely want to do more often.
As always, I also played a rather eclectic range of boardgames. The highlights among them were Undaunted: North Africa, which I bought last year, and Gettysburg (125th Anniversary Edition), a very old game of which I finally found a well-priced second hand copy. It’s a hex and counter game, which I don’t normally like, but it has simple mechanics and a tidy look (no stacks!). Most important of all, it creates a dramatic narrative. In our game of the first day’s battle, with me playing the Union, Schurz’s division made a heroic stand defending the town of Gettysburg itself. If you know how much of a fan of the XI Corps and Schurz’s division specifically I am, you can imagine my delight!
Other noteable boardgames were Spirit Island, which is a favourite of my wife’s, revisiting Lords of Waterdeep, which is the most fun eurogame I know (and probably the only one I really like) and our perennial favourite Race for the Galaxy, for some inexcplicable reasons a game I win more often than not.
Oh, and a couple of days ago I had a game of Xenos Rampant, which rekindled my interest in sci-fi miniatures gaming. Maybe there will be more action for my 15mm sci-fi collection in 2024…
Xenos not yet rampant.
As always, I’m a bit surprised by the number of games I got in, especially considering that this year had a number of unpleasant events, including health issues and a (planned) hospital stay which knocked me out for a while. It is all the more gratifying to see the place gaming has in my life and I’m very grateful to all of my gaming partners for providing joy even if so-called real-life events sometimes make things difficult.
I don’t do plans, so there’s not much I can say about 2024. I’d like to keep up the gaming, as this is the most important thing about the hobby for me. Miniatures wise, I feel that I’m still not finished with naval stuff, so there’ll probably be more ships. After the Xenos Rampant game, I rummaged through my lead mountain and started to paint a couple of sci-fi vehicles. Hopefully, I’ll finish my ACW rules. A campaign combining 17th century naval and land actions would be cool. RPG wise, I’m lucky to have two thing to look forward to: Call of Cthulhu in our remote group and Warhammer Fantasy Roleplay, which Christoph wants to run next year. For boardgames, I’ll let myself be surprised what’s coming up. And as always, I’d like to blog more…
I hope you also had a good year. I wish all of you a Happy New Year and the best for 2024. Happy gaming!
As is by now tradition, I invited Sigur, Virago and Martin over to have a big game of Sharp Practice for my birthday. This time, we played a historical scenario from the 1809 campaign.
At the beginning of May, the French were in pursuit of the Austrian VI Corps. Marshal Masséna had sent one of his aides, Adjutant-Commandant Trenquayle (played by Martin), to take command of the advance guard of General Carra Saint-Cyr’s division. West of the small town of Eferding, they ran into an Austrian rearguard composed of Grenzinfanterie-Regiment Nr. 13 (Wallachisch-Illyrische) under Oberst Franz von Gratze (played by Virago) and the 2nd Viennese Volunteer Battalion under Oberstleutnant August Ernst Freiherr von Steigentesch (played by myself). The Austrians had taken position behind fences and in the farms outside the town walls, so a cavalry attack seemed imprudent. After a first, inconclusive skirmish, Trenquayle asked Carra Saint-Cyr for reinforcements and attacked with the 24e Régiment d’Infanterie Légère and elements of line infantry, probably from the 4e or 46e Ligne (commanded by Sigur).
The map (from the late 18th century Josephinische Landesaufnahme) shows Eferding and surroundings, with the blue box indicating the area depicted on the table.
As Eferding still had its medieval town wall, this was a great opportunity to finally use the castle walls I bought ages ago (at my first CRISIS, to be exact). However, I also quickly scratch built a town gate to give it a more Austrian look.
This is a 17th century view of Eferding, with the box again indicating the area depicted on the table.
And this is my attempt at recreating the view:
And the overview:
The blue circles indicate the position of the French deployment points, the yellow circles those of the Austrian.
The Austrian objective was to either reduce the French Force Morale to 0 or to withdraw at least 4 intact groups into Eferding. However, they could only withdraw after either their or their opponents’ Force Morale had fallen to 4 or lower. The French had to prevent this.
Quicker to deploy, the French brought in two compact lines, both with a skirmisher screen, as well as one group of skirmishers on their right flank. The Austrians just deployed the Landwehr, which was positioned on the flanks, and the Grenzer skirmishers on their right flank. The Grenzer line groups were kept in reserve.
The massed French advance looked pretty impressive and a bit intimidating to the Austrians, but soon the image was marred by a plucky Grenzer Sharpshooter, who shot Adjutant-Commandant Trenquayle from his high horse! Trenqualye was only knocked out and back on his feet in a short time, but still – it hurt the French pride and, what was more important, their Force Morale.
Unfortunately, the Landwehr skirmishers on the Austrian far left realised that they forgot to pack extra ammunition, meaning they could only fire at close range (random event). They decided to make a virtue out of necessity and worked their way forward on the left, trying to outflank (or at least threaten) the French flank.
They got up to the frontmost fence, but were then charged by the French voltigeurs and driven back with losses. For the rest of the game, the opposing groups continued a fierce musketry duel, with both leaders hit and wounded.
Oberst von Gratze nodded approvingly at the aggressive stance of the Landwehr and decided to make an even bolder move: He deployed two of his line groups at the forward deployment point, right in the center, opposite the gap between the two French lines. They fired and then charged the French skirmishers in the orchard, but inflicted only insignificant casualties. However, the French were now forced to react to the sudden threat in their center.
The French manoeuvred to get the Grenzer into their arcs of fire, withdrawing part of their righthand formation and splitting their left line into two wings. Meanwhile, von Gratze deployed the rest of his force. Everything was now on the table.
The leftmost French line received intense fire from Grenzer skirmishers, taking casualties and shock, but still advancing towards the Landwehr and the French primary deployment point. They opened fire on the Landwehr but only caused insignificant damage. The Landwehr held back for a controlled close volley.
In the center, the Grenzer in the orchard got into a cross-fire, but managed to withdraw in relatively good order and took position behind the fence.
On the Austrian left there was a stalemate, with Landwehr and Grenzer behind the fence awaiting the French advance.
This was the situation when he had to end the game due to time. Things were going quite well for the Austrians: the French attack had stalled, their right wing was somewhat stuck and would have to reorganise the groups that manoeuvred back to contain the bold Grenzer attack before crossing the fence and advancing into the fire of the waiting Landwehr and Grenzer. The Austrians would now have concentrated all their energy on hitting the leftmost French line – the Grenzer skirmishers as well as the Landwehr would have tried to inflict enough casualties to reduce the French Force Morale, which already was at 6, to 4, and then commence their withdrawal into Efferding. Virago and I were pretty confident that we could have pulled it off…
Another excellent game of Sharp Practice! It had a really interesting dynamic, the highlight being Virago holding the bulk of his forces back and then deploying them right in the center. This brought the orderly French advance into disarray, made a dent in their line and eased the pressure on my right flank Landwehr.
The only thing I will consider for next time is to either find a date where we can start earlier or play longer, e.g. a Friday. We didn’t actually play that long (about two and a half hours total playing time), and about 45 minutes more would probably have been sufficient to come to a conclusion, so that will be my benchmark for next time.
After the long COVID break, I’m really happy to play again with my friends. I’m very grateful to Sigur, Virago and Martin for indulging me, this really was a great birthday present! Thanks guys!
It is well known that during the War of the Fifth Coalition, the British subsidised the Austrian war effort with huge sums. But how did the money get to Austria? Part of it was transported in silver and bills via Hamburg and Breslau to Vienna, using bankers as intermediaries. Another part was landed in the Adriatic. It seems that there were two separate deliveries, although the literature is in disagreement about the exact dates and the ships involved. It is pretty certain that in the middle of June, British frigate HMS Mercury broke through the French blockade of the Adriatic coast and landed 157 crates filled with silver and gold at Zengg (today Senj in Croatia). The crates were then transported to Agram (today Zagreb) and Esseg (today Osijek). They weighted almost 44 tons and contained silver and gold worth about 25 Million pounds in today’s money. A quick calculation shows that the transport would have needed about 9 wagons, each pulled by 6 horses.
A story to fire the imagination! Especially if you have, like me, always had a soft spot for the 1970 WW2 adventure comedy Kelly’s Heroes, featuring Clint Eastwood, Telly Savalas and Donald Sutherland as disillusioned American soldiers who stumble upon information on a huge gold treasure hidden in a bank behind German lines and start a private expedition to rob it.
I decided that all of this would make a great campaign for Sharp Practice. As I’ve never played a proper Dawns & Departures campaign, it was obvious to chose that format. I also wanted to include my friend Stephan in Sweden, so a remote campaign was the way to go. I roped in another friend, Martin, and started to draw a map.
It would have been fun to set the campaign in Croatia, where the French under Marmont fought the Austrians in a campaign that included British naval landings and intervention by Turkish raiders. That would also have fit with the fact that the movie Kelly’s Heroes was actually shot in Croatia! However, although I have a little bit of mediterranean terrain, most of my collection only works for Austria or Southern Germany, and all my napoleonic figures are also based with this in mind. So I decided to re-locate the campaign and assume that the Austrians have sent the treasure in the direction of Vienna. However, as the French more or less control Lower Austria, the commander of the convoy decided to temporarily store the treasure in a small castle in Styria and send a messenger to the Austrian Emperor, at that time in Hungary, asking him what to do with the money.
Our campaign starts with a French sergeant finding the heavily wounded messenger and searching his sabretache, where he finds a letter indicating the location of the treasure. He informs his superior, Capitaine Queley, who decides to put together a “private enterprise operation” (to quote Kelly in the movie). As he needs cavalry, he asks an eccentric officer of Chasseurs à Cheval only known as Dingue to join him. Dingue agrees, and our heroes march off to Styria.
In our game, Stephan plays Queley, Martin is Dingue and I play the Austrians and act as an overall game master, like in a role-playing game. The players started at Aspang, knowing that the treasure is kept in the castle at Trautmannsdorf. The first turns therefore where straight-forward. When the cavalry patrol reported Austrian Landwehr stationed at Vorau, they decided to attack, but were delayed by a rainstorm. When the attack finally began, the French swept the Styrian Landwehr under Oberst Schmalzenegger from the table. Schmalzenegger was not keen to stand against French regulars and got most of his troops off the table, but Dingue had kept cavalry in reserve and pursued, dispersing the Landwehr and capturing a supply wagon.
Queley and Dingue are pretty happy: their operation has got off to a good start. The only slightly concerning news comes from their scout, who has discovered Austrian line infantry at Hartberg… but for now, everything looks good and the men have a spring in their step!