Fighting at the Forney Farm – Our Game

Last week, I had Sigur over for a last game before Christmas. We played Sharp Practice, using my Fighting at the Forney Farm scenario. Sigur played the Union, while I took command of the Confederates.

1TableSetup
The set-up.

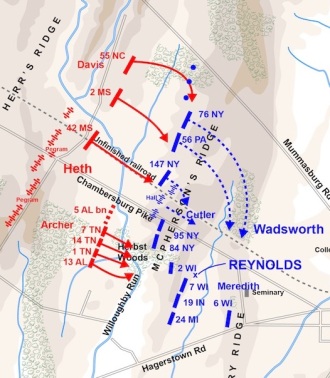
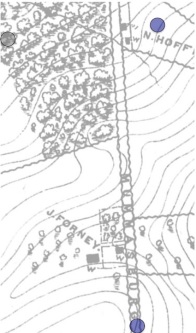
In this scenario, key for the Confederate player is to push through to the Union Primary Deployment Point while keeping the Union forces coming from the Hoffman house behind the Confederate position in check. With the firepower of breech-loading carbines, it’s a very bad idea to get caught in the back!

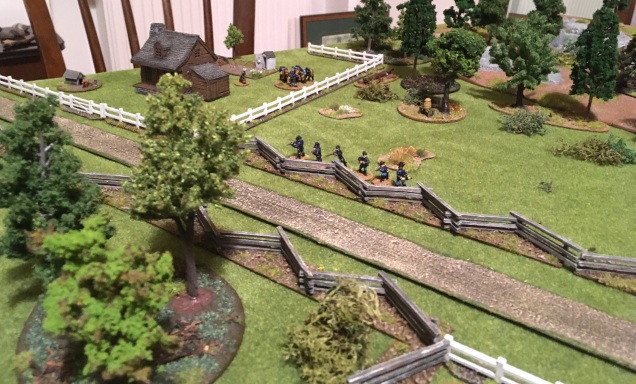
I started by deploying a line of three regular groups at the Eastern fence, reading to march towards their objective. At the same time, I deployed some skirmishers at the Northern fence to keep an eye on the Union pickets.

2ConfLineJumpoff
Getting ready for the attack.

Sigur deployed a dismounted group near the Hoffman house to harass my skirmishers. 

3UnionPickets
Union pickets.

Of more concern to me were the two mounted groups he deployed at his primary Deployment Point. Those guys rushed towards the orchard near the Forney farm, dismounted and took position just outside my line of sight.

I wanted to lure Sigur into deploying more units at the Hoffman house, as I hoped that would make it easier to reach my objective, so I detached a group form my line and had it take up position at the Northern fence. The ball opened with Sigur’s pickets shooting at my skirmishers, which took quite a beating and had to retreat.

4BallOpens
The ball opens.

I also deployed my other line and had it march in direction of the Hoffman house. In answer, Sigur deployed the rest of his units there. I got what I wanted – now it was a matter of speed and decisiveness. So my Eastern line stepped off, climbed over the fence and marched towards the Forney farm and the waiting carbines of the Union troopers.

5ConfMarchOff
Step lively lads!

Meanwhile, the Confederate pickets took my poor bloody infantry under fire. A lucky shot hit and instantly killed my Force commander! That was bad news, as my line facing the Hoffman house was under considerable pressure and unable to do much.

6UnderPressure
Under pressure.

However, my other line was making good progress. As it approached the orchard, to my surprise Sigur decided to pull his troopers back. 

7StandOff
At them, boys!
8UnionRetreats
The troopers skedaddle. Also, the barn caught fire.

He later said he was afraid of the line’s volley fire, which is ironic because I was quite afraid of the firepower of his carbines. Anyway, the troopers rushed behind the farm house, but my line smartly wheeled and poured a withering volley into the skedaddling bluebellies. 

9CaughtFromBehind
Caught from behind.

This was a heavy blow – one group broke immediately and the other was badly shaken. This more or less sealed my victory. My line advanced without impunity and detached a group to rush the Union deployment point. A Confederate victory!

10Victory
Victory!

This was one of the best games of Sharp Practice I’ve played in a while. SP always gives good games, but I felt that this scenario worked especially well (if I may say so myself). It was quite balanced, which is difficult when one side has breech-loading carbines, and the game was close-fought – my Force Morale was at 4 when I reached the objective. With the two Union deployment points positioned on either flank of the Confederates it also poses an interesting tactical problem for both sides.

Sigur said that he made one big mistake, and that was to keep his troops at the Forney farm in cover and then pull them back. I’m pretty sure that, had he taken my line under fire, it would have been much more difficult to get to my objective. Perhaps we’ll have a refight one day…

Fighting at the Forney Farm – A Scenario for Sharp Practice

The Historical Background

Around 9.30 on July 1st 1863, Brig. Gen. Henry Heth’s Division commenced its attack on the Union position on McPherson’s Ridge at Gettysburg. While Archer’s Brigade was deployed south of Chambersburg Pike, Davis’ men advanced to the north of the road. The leftmost regiment of the brigade, the 55th North Carolina, spotted some cavalry to their left. Those were pickets from the 9th New York cavalry, which were positioned on the Mummasburg road near the Hoffman house.

Alfred_Horatio_Belo
A. H. Belo

Alfred H. Belo, the 55th’s colonel, was concerned that the Union cavalry might make a mounted charge against the exposed left flank of the Confederate line of battle. “[…] I deployed a line of skirmishers from the two extreme left companies to protect us at that end, and at the same time pick off the cavalrymen […]”, Belo wrote [1]. In doing so, the regiment started to drift to the North and lost contact with the rest of the brigade.

Meanwhile, Capt. Timothy Hanley of Company F of the 9th NY ordered Lt. A. C. Robertson with 20 men to support the pickets. At the Hoffman house, they hit upon the skirmishers from the 55th NC, which were advancing in considerable strength from the woods south of the road. Robertson was forced to fall back towards the position of Hanley’s squadron, which was deployed east of the Forney farm in a line straddling the Mummasburg road. When the Confederates reached the Forney farm, some of the squadron’s men dismounted and counterattacked, driving them from the buildings. However, the Confederate pressure was too much and the troopers retired towards Seminary Ridge [2].

This action, which is but a footnote to the Battle of Gettysburg, nevertheless makes a perfect scenario for Sharp Practice. Using skirmish rules to refight actions from big battles is usually problematic. However, in every big battle there were small, self-contained fights that lend themselves very well to be recreated. This is an interesting example, as it shows that even large-scale affairs – such as a divisional attack – consisted of inumerable small movements, the mastery of which was called ‘articulation’ in contemporary tactical parlance. In this case, Col. Belo knew that his regiment was guarding the flank of the brigades’ attack. Upon discovering an unknown number of Union cavalrymen to his left, he detached two companies to contain this threat. In doing so, however, it seems that he lost coordination with the other regiments advancing on the Union line at McPherson’s Ridge.

MapContext
The context of the skirmish.

From hindsight, we may judge that the isolated companies of the 9th NY probably didn’t pose much of a threat to the attack of Heth’s division. However, in the field, it was Belo’s call to make a quick decision, and by deploying his skirmishers he demonstrated a proficiency in articulation, defined by Earl Hess as “the facility with which commanders and men are able to make complicated formations and maneuvers” [3]. While Belo himself seems to have been competent enough, the 55th NC was not only a large regiment with around 640 men, but it was also inexperienced, as it had been mustered in the previous May and had not seen much action since [4]. In contrast, the 9th NY was a veteran regiment, belonging to Devin’s brigade of Bufords division, and the commander of Co. F, Capt. Hanley, had previous experience in the British army, where he had served in the Crimean War and in India [5].

With a handful of pickets, supported by one company, they managed to make a good show of themselves and even mounted a counter-attack at the Forney farm. Their staunch fight was probably responsible for the 55th NC’s drifting  northward and losing contact with the rest of the brigade. Ironically, this brought the regiment into a position to threaten the flank of the 76th NY occupying the rightmost end of the Union line on McPherson’s Ridge.

As we all know, the early fight for northern McPherson’s Ridge ended with a Union retreat. Davis’ brigade would then wheel to the right and meet their demise at the unfinished railroad cut.

The small skirmish at the Forney farm shows that even large-scale affairs can, when implemented on the lowest level, create fights that on a tactical level have only a lose connection to what is happening elsewhere, while still being shaped by the strategic vision of the overall attack. It also shows that this fragmentation can lead to unforseen consequences – such as bringing the 55th NC in a position to potentially outflank the Union infantry line. Again, we are reminded of Carl von Clausewitz’ notion of friction: “This enormous friction, which is not concentrated, as in mechanics, at a few points, is therefore everywhere brought into contact with chance, and thus facts take place upon which it was impossible to calculate […]” [6].

The Scenario

Map

ScenarioMap

Deployment

The Confederates Deployment Point is placed in the woods at the Western table edge. The Union Primary Deployment Point is on the road at the Southeastern table edge. The Union secondary Deployment Point is at the Hoffman house.

Victory Conditions

The Confederate objective is to take the Union Primary Deployment Point. The Union has to reduce the Confederate Force Morale to 0 to win.

Special Rules

Along the road: As soon as at least one Confederate unit occupies the road, the Union may no longer deploy units at their secondary Deployment Point. However, if they have not yet deployed a unit at the Hoffman house, they may do so as long as the DP is not taken, even if the road is on Confederate hands. This represents the pickets positioned at the house.

Forces & Rosters

Union: 3 leaders, 5 groups of the 9th NY cavalry.

UnionRoster

Confederates: 5 leaders, 6 groups of the 55th NC and 2 groups of skirmishers.

ConfRoster


Footnotes

[1] Wittenberg, Eric: "The Devil's to Pay". John Buford at Gettysburg. A History and Walking Tour, El Dorado Hills: Savas Beattie 2018, p. 100.

[2] Cheney, Newell: History of the Ninth Regiment, New York Volunteer Cavalry, New York: Poland Center 1901, p. 107.

[3] Hess, Earl: Civil War Infantry Tactics. Training, Combat and Small-Unit Effectiveness, Baton Rouge: Louisiana University Press 2015, p. 243.

[4] Gottfried, Bradley M.: The Brigades of Gettysburg. The Union and Confederate Brigades at the Battle of Gettysburg, New York: Skyhorse Publishing 2012, p. 614.

[5] Petruzzi, David J.: "Faded Hoofbeats: Lt. Col. Timothy Hanley, 9th New York Cavalry", available online.

[6] Carl von Clausewitz: On War, originally published 1832, cited after the 1873 translation available online.

The Spirit of ’61 – A Big Game of Sharp Practice

On the occasion of my birthday, I invited Sigur, Virago and Stephan to a big game of Sharp Practice. I’ve always wanted to play a game with four players and more units than usual and this was a perfect opportunity to try this.

Our forces’ objective was to confiscate a whiskey distillery. Both had a wagon to transport the destillery as well as an assortment of infantry and one unit of cavalry. Sigur and Virago played the Confederates, while Stephan and I took the Union. I split the commands, Virago and Stephan playing the C-in-Cs and each getting three Leaders (apart from Sigur, who had four). I took the opportunity to field my 5th New York Zouaves, a colourful troop I just finished painting.

Deployment started a bit slow for the Confederates. They were still crossing the bridge while the Union cavalry was rushing forward and Col. Bendix (Stephan) moving his men into line and into the field.

early1

As my cavalry was rather wimpy in close combat, I had them dismount and advance on foot. When Sigur’s cavalry approached, my dismounted troopers opened the ball by firing a ragged volley. Lo and behold! A lucky bullet hit the Rebel leader and threw him out of the saddle.

early2

Meanwhile, Stephan’s line was opening fire, which was immediately answered by a hail of bullets from Virago’s line and skirmishers behind the fence.

early3

Casualties on the Union line started to mount and it did look grim for a while. However, this firefight sucked in a huge chunk of the Confederate forces, which was actually working to our advantage. Slowly, we worked the dismounted cavalry and Zouave skirmishers forward on our left flank, trying to outflank the Rebels. They managed to drive back the cavalry but had not enough firepower to finish the job on their own. 

midgame cav battering

As so often in Sharp Practice, it would be a question of time: Could the hard-pressed Union line hold until the Zouave arrived and put pressure on the Confederate right flank?

Capt. Kilpatrick from the 5th N.Y. had some difficulties getting his unruly men over the bridge. However, when they finally made it, they rushed forward to seize the distillery and take up position to ease the pressure off their comrades to their right.

zouavesarriving

Col. Bendix had started to slowly move his men backward so as to get them out of the firing arc of the Rebel line. After some difficulties, he succeeded, while the Confederates, dazzled by the smoke and noise, continued firing uncontrolled.

Kilpatrick had meanwhile not only brought his men into position, he also had managed to convince the moonshiner to hand the distillery over to the Union. The fellow even joined the Zouave ranks, no doubt beguiled by their colourful uniforms.

lategame_zouaves

And now came the luck of the Irish: Four command cards made it possible to activate Kilpatrick twice, pouring two withering volleys into the Confederates standing to the Zouaves’ front. They never stood a chance  – one group was obliterated and routed, while the other held on but was in a very bad shape.

lategame salvo yikes

This was the climax of the game and it secured the Union victory. With one stroke, the Confederate flank was gone.

Some Rebels, however, could not accept defeat. In what was the game’s most heroic moment, the Confederate cavalry leader, after being woken by the regimental physician and finding himself alone, drew his sabre and single-handedly charged the dismounted Union troopers. He managed to win melee, driving the wimpy troopers away.

endgame charge

This however could not really change the overall situation and the Confederate C-in-C conceded defeat.

A victory of the Union, who no doubt celebrated their triumph by tasting the hard-earned liquor!

Sharp Practice delivered another dramatic game. When Stephan’s hard-pressed line almost started to waver, we both feared for the worst. However, the timely arrival of the Zouaves saved the day for the Union.

It was a novel and fun experience to play Sharp Practice with four people. All in all, we had thirteen leaders and twenty units, with a total of about 160 figures on the table. This is a lot for someone who is accustomed to small skirmish games! Interestingly, changes in the card deck dynamics were perceptible – there were less random events and it was harder to collect command cards.

I’m very grateful to my friends for joining me in this game – thanks guys, this was a great birthday present! And once again thanks to Sigur for letting me use his photos.

The Raft Lookout

What’s recently caught my eye in the wonderful world of tabletop gaming?

critI’ve started watching the second season of Critical Role, the fabulous RPG video series where a bunch of voice actors play D&D. So far, I find it even better than the first season. Critical Role has now started a Kickstarter to finance an animated series based on the first episode. They are known for their loyal fan base, but this exceeded all expectations: so far, they managed to get over $ 7.5 Million! That is a lot of money, especially for a Kickstarter where people don’t get a ton of stuff. In fact, the animated series will be free to watch, regardless if you back the Kickstarter or not. If you want to back it, it’s still running:

mwAs you know, I like magazines. I’ve recently decided to take out a subscription to Miniature Wargames. I’ve had it for a while before but canceled when Henry Hyde was ousted. I was pleasantly surprised by the last issue. What I especially like is the regular feature by Jon Sutherland called Command Decision. It’s a series of scenarios in a similar format to the venerable Table Top Teasers. What’s original about Jon’s scenario design is that he includes a pre-game decision which will shape the scenario to be played. This gives the scenario a bit more context and involves the player into the wider narrative without having to unfurl all the paraphernalia of a campaign. A really clever idea! I already regret having missed the previous scenarios and hope that Jon might be convinced to collect his Command Decisions in a book…

OLTcolor (Small)The ever inventive Joe McCullough has recently started an interesting new wargaming format. Under the title Operation Last Train, he has published sci-fi rules intended to game the evacuation of civilians from alien-held worlds. The interesting thing is that this is a charity project: not only are gamers asked to donate £3/$5 to Save the Children when downloading the rules, but Joe will also play a campaign. For each civilian he will rescue in-game, he will donate 10 cents. This is a fascinating and – as far as I know – novel way of linking gaming and real-world issues. People are invited to join in and there has already sprung up a lively community on Facebook.

D1dAHuJXQAII1zsThere is also news from Bad Squiddo Games! Annie has been very busy: She has acquired the magnificent terrain range from Ristul’s Extraordinary Market, which is now sold under the name of Bad Squiddo Terrain. New models have already been announced – I especially like the angry tree stumps and the scarecrows. She is also continuously expanding her believable female miniatures. Next up are more WW2 models, this time women from the Auxiliary Territorial Service. Annie has posted a preview with interesting insights into the design process on the Lead Adventure Forum. I’m looking forward to seeing more of those figures.